Blog Updates! (Meta-Post)
Info
I’ve made some updates to the blog! I’m talking updates beyond just writing posts, and more focused on expanding the blog’s capabilities. So, in true content-farming fashion, I wanted to write a little blurb about some of the new changes, in hopes that others may find inspiration with extending their own Jekyll blog.
LaTex (Mathjax)
I wanted to have a way to render complicated mathematical notation within the content of my posts, and I was determined to find something reminicent of LaTex. Partially because I had some familiarity with it from school, and also because it’ll be nice to have some fluency for if I ever go back to school. Enter Mathjax: the poor man’s javascript based LaTex expression parser.
With mathjax, I can both inline a LaTex expression for fancy notation like \(f(x)\), but also format larger blocks of expressions! Below I’ll offer a quick induction proof by induction of the definition of the “Gamma Function” from analysis. That is, that \(\Gamma(n) = \int_0^\infty{x^ne^{-x}dx} = n!\)
Proof
Let \(P(n):= \int_0^\infty{x^ne^{-x}dx} = n! , \forall n \ge 0\)
- \(P(0)\) : (Base Case)
- \(P(k) \implies P(k+1)\): (Induction Step)
Assuming our hypothesis holds for all \(k\), we need to show it holds for \(k+1\). Using product rule on \(\int_0^\infty{x^{k+1}e^{-x}dx}\) (Recall \(udv = uv - vdu\))
Where we used the induction hypothesis for \(\int_0^\infty{x^{k}e^{-x}}dx = k!\). Technically, most people tend to assume \(\Re(n) \gt 0\) and show \(\Gamma(n+1) = \int_0^\infty{x^{k-1}e^{-x}}dx = n!\), so I took a slightly lazier approach here. Whats more important is to show that \(\Gamma\) is analytic, as it is supposed to be the analytic continuation of the factorial function into the complex domain. But I’ll leave that part as an exercise :)
I’m still not the most fluent in mathjax, so often I have to consult reference guides to accomplish my tasks:
Processing (p5.js)
Another feature I’ve desired for awhile now is the ability to render audio/visual simulations in browser, embedded directly in a blog page. Every now and then I like to “sketch” something artsy with code, and it’d be nice to have an easy way to share those creations with others. Introducing p5.js: a javascript implementation of the Processing programming language.
Processing is a language specifically designed for creative audio, visual, and interactive programs. As such, it is widely used by creatives and researchers alike to create fun visualizations of data or engaging digital art demos. Its incredibly simple to spin up on Processing if you have any programming experience, and the tutorials online are awesome.
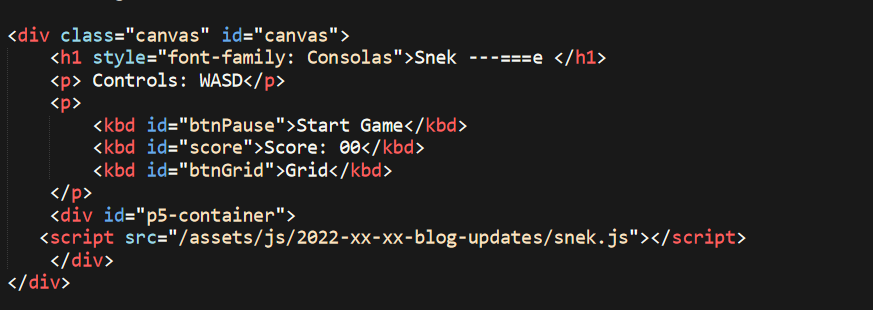
Instead of using raw Processing, p5.js allows me to leverage common constructs from Processing to create browser-based demos. To embed these demos in my blog pages, I can simply inline a HTML canvas into the body of the markdown post, and then have the <script> tag point to the asset I want to include.

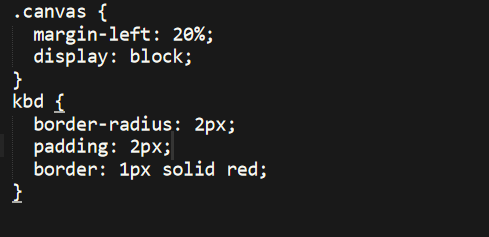
Embedding the p5.js demos in a canvas give me the ability to style how they appear in the page through CSS.

As an example, I whipped up a quick snake game clone affectionately dubbed “Snek”, following the general gist from this project. Procrastinate from your life, and come try for the high score!
Snek ---===e
Controls: WASD
Start Game Score: 00 Grid
Managing Dependencies
All these new features didn’t come cheap. Well, literally they were free - but I did have to spend a bit of time understanding a sane way to handle these outside dependencies in my blog pages. Fortunately with Jekyll templates, the solution was only adding a few files to my site. Namely, I created a dependencies.yml file under my site’s _data folder, which holds the actual library references:
# dependencies.yml
- name: p5
  element: <script src="https://cdnjs.cloudflare.com/ajax/libs/p5.js/0.5.11/p5.min.js"></script>

- name: p5.dom
  element: <script src="https://cdnjs.cloudflare.com/ajax/libs/p5.js/0.5.11/addons/p5.dom.min.js"></script>

- name: p5.sound
  element: <script src="https://cdnjs.cloudflare.com/ajax/libs/p5.js/0.5.11/addons/p5.sound.min.js"></script>

- name: mathjax
  element: <script id="MathJax-script" async src="https://cdn.jsdelivr.net/npm/mathjax@3/es5/tex-mml-chtml.js"></script>

- name: polyfill
  element: <script src="https://polyfill.io/v3/polyfill.min.js?features=es6"></script>
Then, in my _includes I can add a dependency.html snippet template that will add a given dependency to the page wherever I choose to include it.

Since I’m only ever going to need these libraries in the body of a blog post, all that’s left to do is add references to dependency.html in my post.html layout template, which I keep in _layouts. I just simply inlined a reference to each mathjax and p5.js library I need, so now they will be automatically included in any post going forward.

Its probably not the most elegant solution, since I might not need these dependencies in every post I write, but its nice to have them available in case I get inspired.
Analytics
Finally, I wanted there to be some way of tracking engagement with my blog. Is anyone actually reading it? Or am I shouting into the void - either one is fine by me. But this way, I can at least understand a bit more about my audience and what they find interesting. After doing a bit of research, utilizing Google Analytics seemed like the best solution. “Best” here refers to how easy it was to implement relative to the features it provides.
All I had to do was set up a Google Analytics account and add the gtag reference to my _config.yml like so
google_analytics: G-<your tag here>
Then, I created a quick template to generate the javascript automagically in my _includes, using my site’s analytics tag I just defined in _config.yml:
<!-- Global site tag (gtag.js) - google-analytics.html -->
<script async src="https://www.googletagmanager.com/gtag/js?id=G-3QD5N0KWMZ"></script>
<script>
  window.dataLayer = window.dataLayer || [];
  function gtag(){dataLayer.push(arguments);}
  gtag('js', new Date());

  gtag('config', 'G-3QD5N0KWMZ');
</script>
Last but not least, we need to make sure the analytics template gets applied to each page, so I can just set a conditional include in my default.html layout in my _layouts.

Ta-dah! Now I can check the analytics on all my pages from the Google portal. Thanks for all the engagement!

Aside: Privacy
I’m a pretty big privacy nut, so I understand the irony involved with using Google Analytics to track engagement on my blog. Really, I’m only trying to collect info on if anyone is viewing the blog, and what pages seem to be the most popular. I hope this doesn’t deter future potential readers, as I promise I am not allowing the data to be used explicitly for advertising features. But as you and I both know, that doesn’t mean the surveillance abuses are completely neutered.
All I’m interested in collecting are:
- Session statistics — duration, page(s) viewed, etc.
- Referring website details — a link you came through or found through native search
- Approximate geolocation — country, city.
- Browser and device information — mobile vs desktop, OS usage, etc.
If you really want to avoid getting fingerprinted, both from my blog and others across the dirty ‘net, I recommend adding some privacy-focused browser add ons. I’m a big fan of the following:
- uBlock Origin open source content and add blocker
- Decentraleyes protects against CDN fingerprinting abuses
And obligatory, “Use Firefox!”… or just not Chrome. Cheers!