A Rootin' Tootin' Mobile Roundup
Ooof, I’ve fallen a bit out of schedule for the blog updates in recent months. For a lighter and quicker read, here’s a selection of case studies on how to jailbreak/root a phone using a few mobile devices I have lying around. Hopefully they can also be used as a tutorial!
… or more likely a self-reference for when I inevitably forget how this process goes, and need to follow these steps again myself.
Anyways, Cheers!
Roots
I’ve found rooting Android phones to be a pretty straightforward process, but I also require my test devices to have certain specificities that make the rooting process easier. If you’re using an emulator, chances are you’ve already got the ability to root your device, so this guide is meant for physical devices. Unless I have a good reason to deviate, my test devices all must be:
- Carrier Unlocked: so the SIM can be vendor-agnostic
- Google Pixel Hardware: less of a chance for vendor bloatware
- Active Support: i.e. still receiving OS updates for more that 2 years after purchase
Magisk remains the most reliable method to root a new device. There’s also an install guide which “inspired” a lot of my writeup, and I recommend checking that out if you find my tutorial hard to follow.
I recommend reading some of their wiki to understand Magisk a bit more, but a few things I thought were neat were that it uses /data/adb as a data directory, and eventually replaces init with a magiskinit for its shady goals.
Android Tools
Here’s all the required tools for rooting an Android:
I’d recommend having test VM with adb and fastboot installed, otherwise this tutorial isn’t going to be of much value. A standard Debian/Ubuntu image (Kali, etc) should do the trick.
Pixel 7
Here’s a summary of the high level steps to accomplish:
- Update device, unlock developer mode & bootloader
- Install magisk app on phone
- Pull device bootloader image from official sources
- Modify stock bootloader image with magisk
- Install new bootloader & reboot
Simple! Magisk takes care of patching the boot image for you. All you need to know is a few adb and fastboot commands which I’ll provide in the walkthrough.
Device Setup
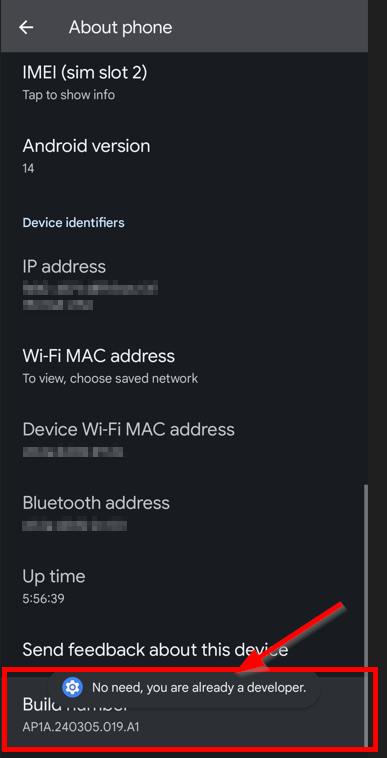
First, we’ll go through the steps to enable developer mode and unlock the Pixel’s bootloader. Go into the Settings app and browse to “About phone”. Locate the “Build Number” and tap this field seven times, or until you see the message “You are now a developer”. Pay attention to this number, as it’ll be needed in a later step.
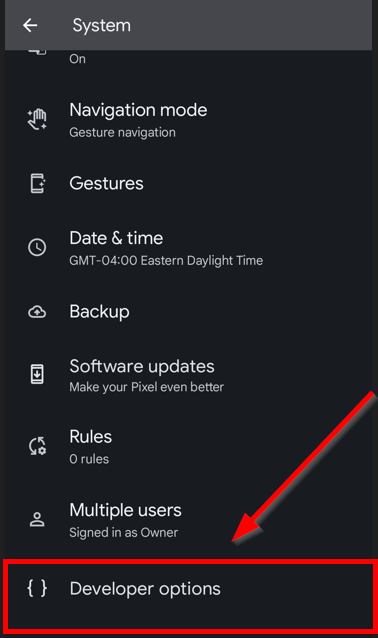
Congrats, you’re now a developer! Well, at least as far as our little Android friend is concerned. Back out of “About phone” in Settings and go into “System”. Scroll until you see the (new) heading entitled “Developer Options” and tap that.
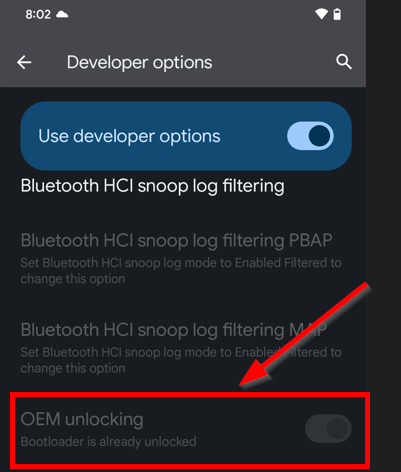
Then, scroll down to find the “OEM Unlock” toggle - note that in the screenshot, I’ve already unlocked the bootloader.
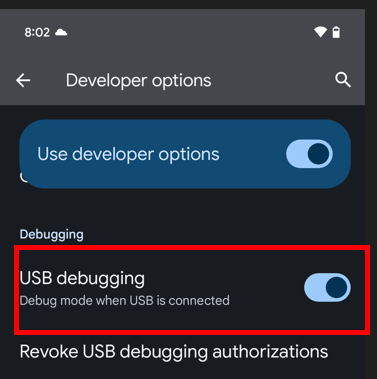
While we’re here, we might as well enable adb access over USB, which we’ll be using shortly to flash a new boot image onto the device.
Then we use adb and fastboot to actually unlock the image.
adb reboot bootloader
fastboot flashing unlock
fastboot reboot
WARNING: Unlocking the bootloader has the net result of wiping the phone’s data, so its best to do this step before installing Magisk.
Install Magisk
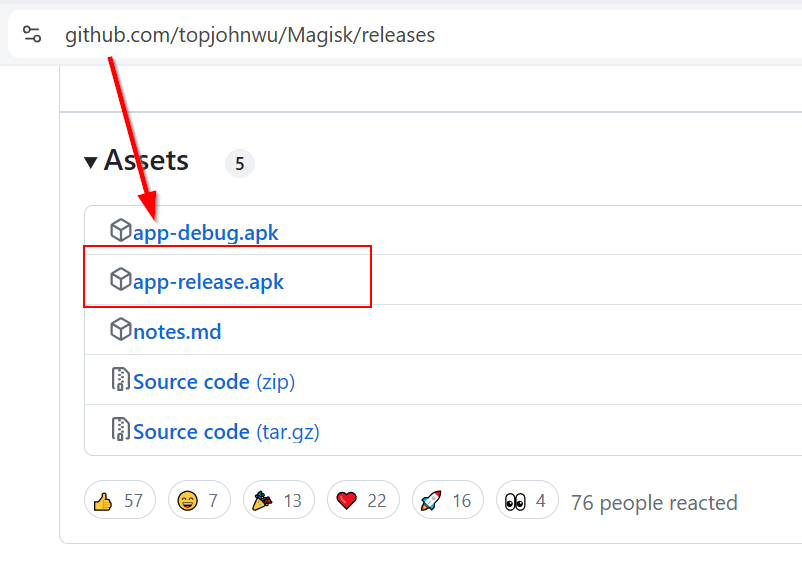
Ater unlocking our bootloader, were all ready to get rooted! First, browse to the releases section of the Magisk repository and download the latest .apk. It’s best to download the .apk to the phone directly, unless you want to download it to a computer and copy it over adb first.
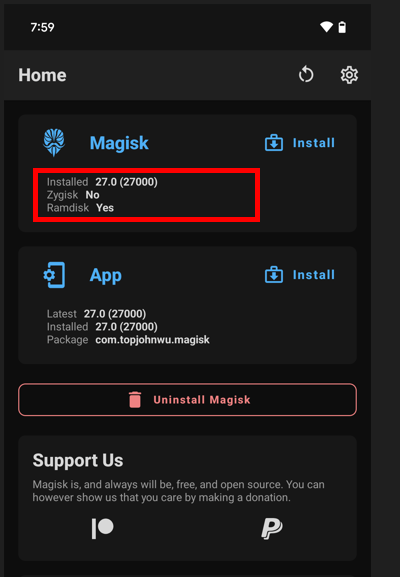
Tap and install the .apk on the Pixel. Our screen should look something like the picture below.
Flash Boot Image
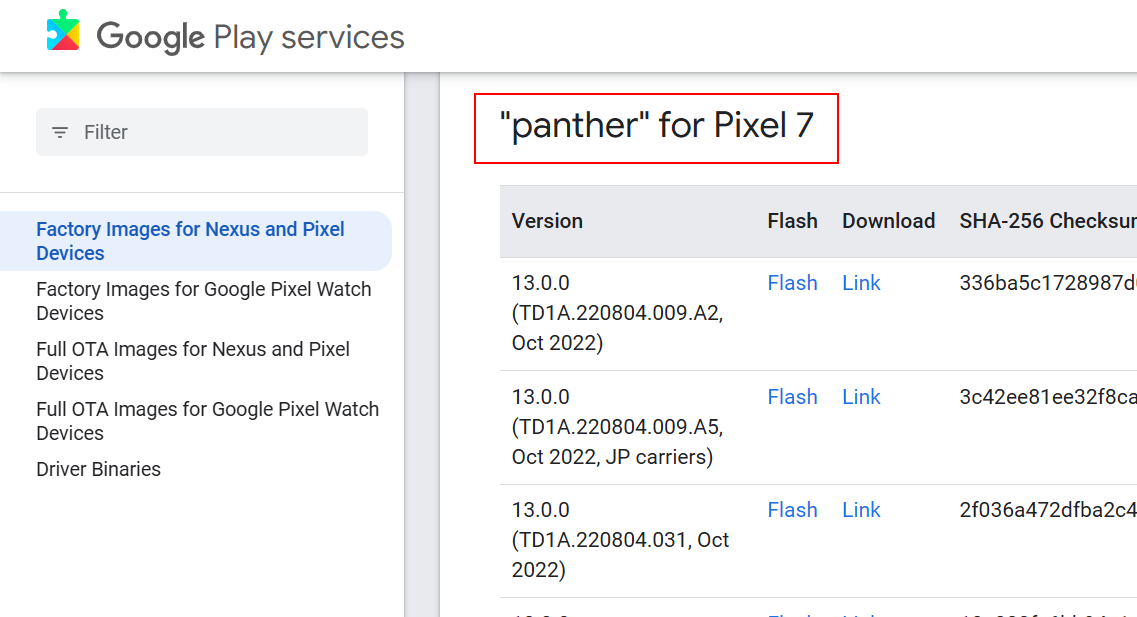
This part can be easy to botch if weren’t paying attention in the previous section. The gist is we need to find the original bootloader image for our device, down to the major/minor OS version and hardware, from the official Android Pixel source images. For a Pixel 7, we’re looking for the latest version of panther.
After downloading the compressed archive, unzip it and examine the contents. We’ll find either the official boot.img or init_boot.img and pass that to Magisk, who will handle the necessary patching of the bootloader. In our case, its init_boot.img. You can transfer over via adb by:
adb push ./init_boot.img /sdcard/Download
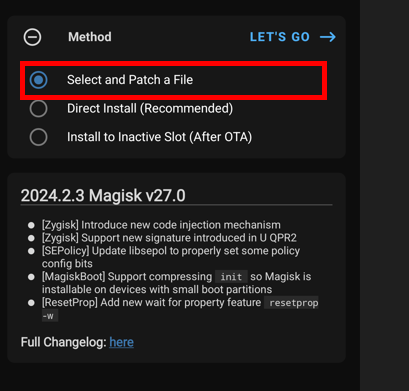
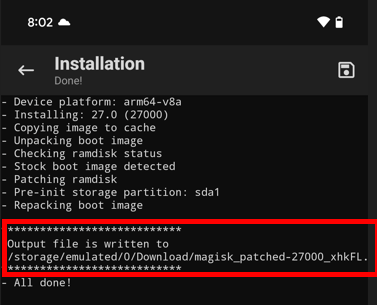
The init_boot.img file should be in the “Download” folder, which we can snatch up with Magisk. Use the “Select and Patch a File” option and hit “Lets Go” when ready.
As soon as Magisk finishes, we can grab the new boot image from the path indicated in the Magisk log file through adb.
adb pull /path/to/magisk_patched.img
We’re all ready to flash the new boot image. Use adb to reboot the device into the boot menu and prepare the device for the write with a few fastboot commands:
adb reboot bootloader
fastboot flash init_boot /path/to/magisk_patched_[random_strings].img
fastboot reboot
After the reboot, go into the Magisk app and follow the prompts to fix the environment. Reboot and voilà, we should be root!
Final Touches
Last thing is to get a root shell on the device. You can verify this through either
adb shell
sudo su
Or by installing a terminal app like Termux. Termux isn’t necessary, but I find its convenient to have terminal access without adb as a requirement.
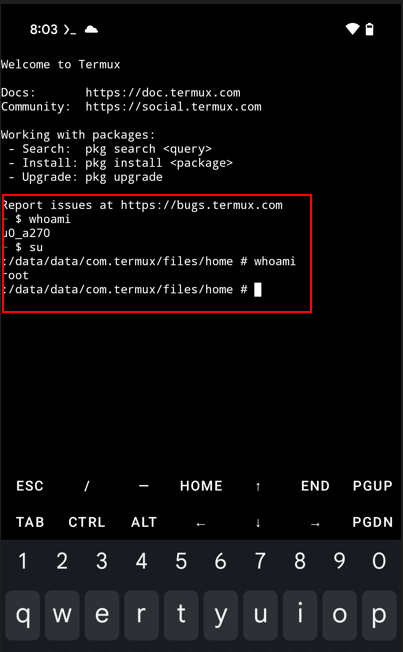
Root, there it is! Last, we’ll copy over a frida-server instance to the /data/local/tmp folder.
adb push frida-server /data/local/tmp
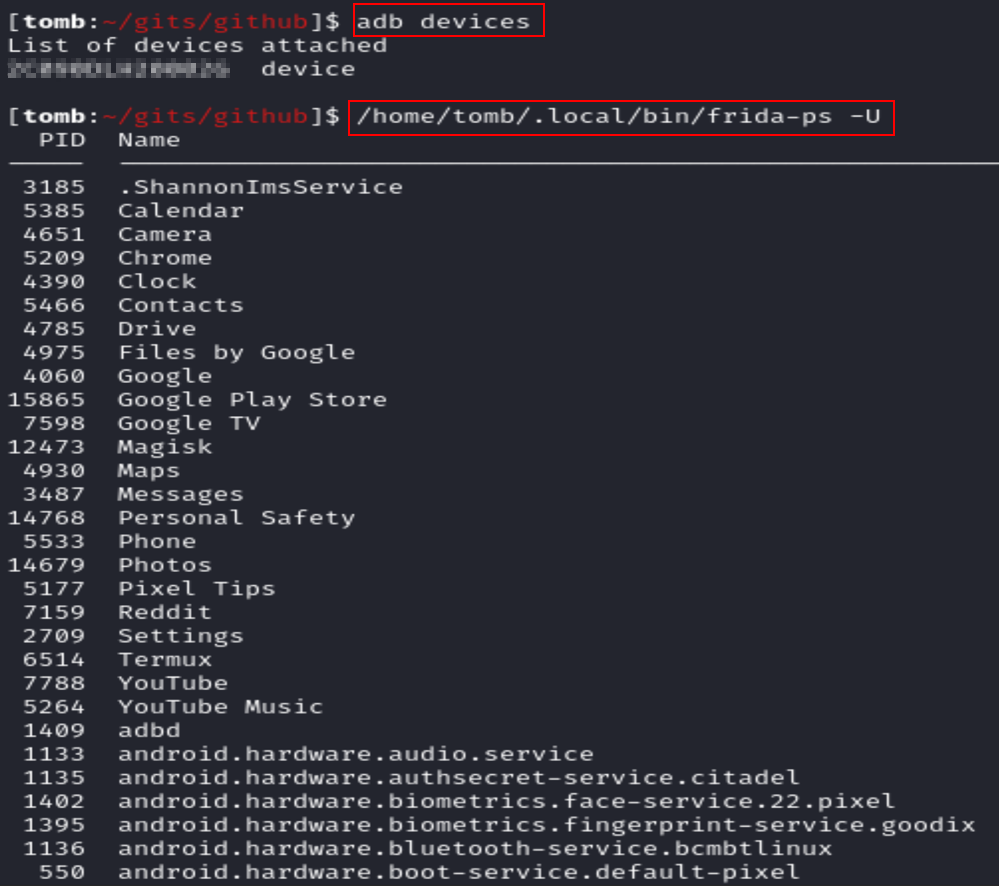
Anytime we want to use frida to interact with an app on the device, we just need to start the server binary as root, which we can conveniently do without the need of adb shell via Termux. Use the rooted Termux session to start the frida server binary via ./frida-server. Running a frida-ps over USB confirms that we can connect to the server running on the device.
frida-ps -U
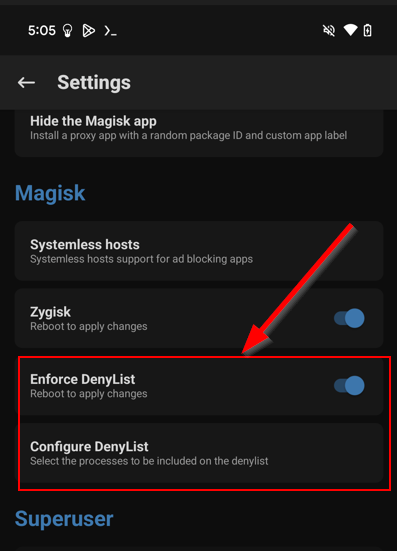
One last trick! In the event that you encounter an Android app that’s performing root detection, Magisk has a “Hide” feature which has proven itself effective to me at circumventing these checks. There’s even a “DenyList” feature which can make Magisk invisible to other apps on the device on a granular level.
Jailbreaks
In contrast to Android, jailbreaking an iPhone can be a tedious and finicky process if you don’t have the right gear, but downright trivial with the right stuff. By “gear” I mean compatible hardware and software for the available jailbreak landscape. Fortunately there are a few sites you can use to check whats possible with your potential jailbreak victim:
The secure boot architecture on Apple devices is pretty nuts, as it involves verifying any piece of code that wants to run against a hardware-based cryptographic key. Essentially, jailbreaking a iPhone is impossible without a clever exploit to get around Apple’s many miserable miserly mitigations.
Corellium is an option if you don’t want the hassle of maintaining a jailbroken physical device. The tradeoff is that since Corellium is emulating the iOS device, it can’t fully emulate Apple hardware and services (Camera, iCloud, App Store, etc) - so you may be unable to test features in mobile apps that rely on those services.
iOS Tools
Tools we’ll need for iOS jailbreak:
I’ve found MacOS to be the most painless experience when working with iOS (how unsurprising), but a Linux image should function as an appropriate stand-in if needed. Most of the tools/techniques will carry over on Linux with maybe a couple slight hiccups. As for using Windows, well I suppose its possible, but I won’t be trying that… and for you brave PC supremacists out there, best of luck to your sanity.
iPhone X
Fortunately for me, iPhone X uses an A11 chip which is vulnerable to checkra1n-style exploits. We’ll be using palera1n specifically, and many thanks to the hard work that went into that fantastic project.
Device Setup
Unlike with Android, we don’t need to do any fancy mucking around with developer settings on the device to prepare it for jailbreaking. Instead, all we need is to setup a connection to the device from our MacOS machine over SSH. We can use the iproxy tool mentioned above to proxy traffic from our local machine through a USB connection to the device over a port we specify.
The syntax is:
iproxy <local port> <remote port>
So below, we have chosen to forward our local port 2233 to 22 on the iPhone X.

This SSH tunnel isn’t strictly necessary for the exploit per se, but its nice to have configured for later steps (and nice to know how to SSH into iPhone’s console).
Palera1n
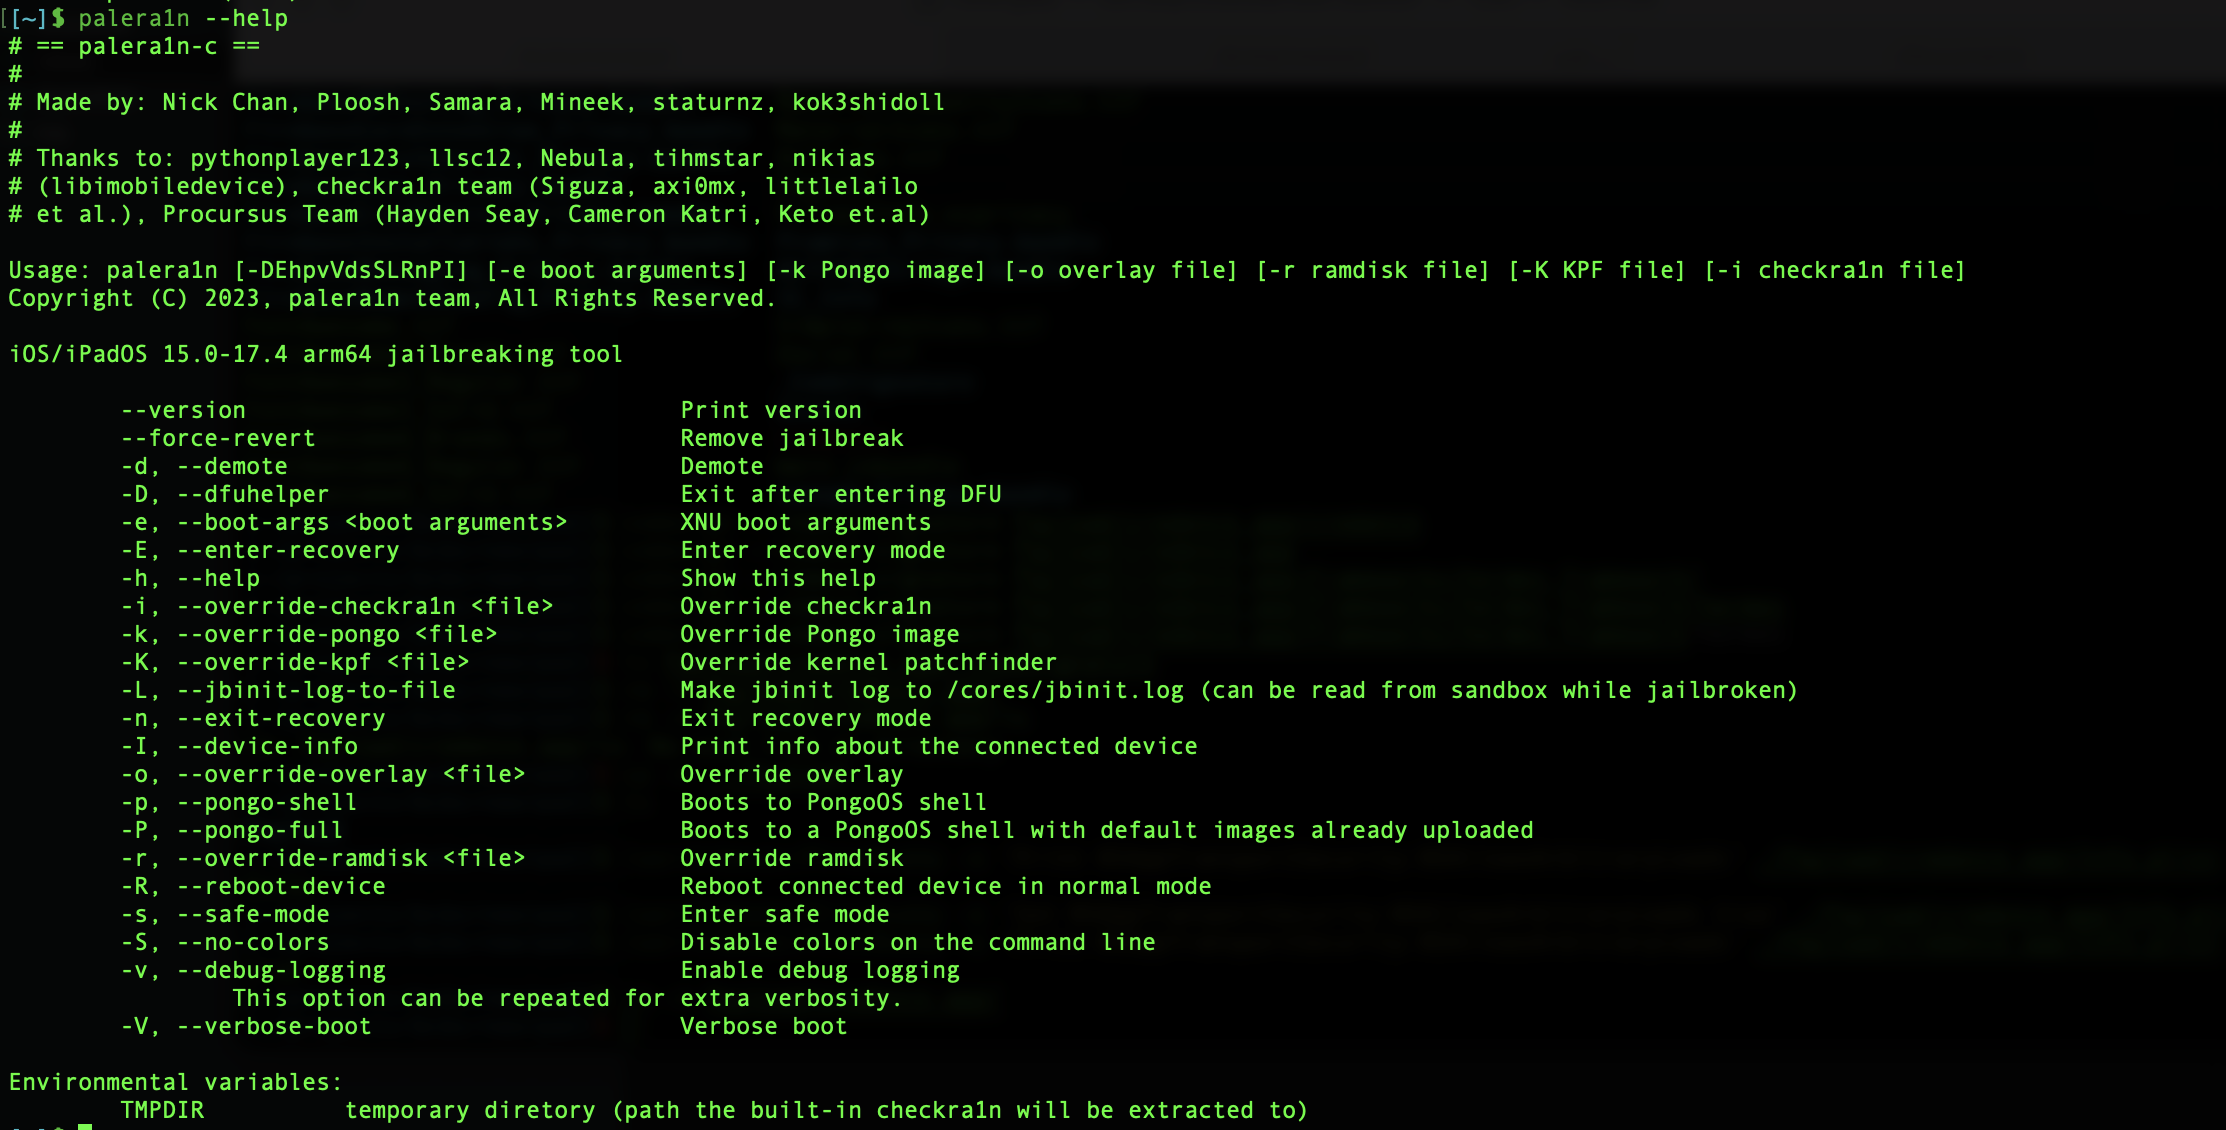
Palera1n is also pretty simple to install and use, just pay close attention to some of the warnings in the documentation, and make sure to read everything carefully. Once configured, you should be able to run palera1n -h to check the version and help information.
Ensure the device is connected to your Mac over USB-C, and run the exploit. The command is just palera1n, and follow the steps mentioned in the tool to force your device into Device Firmware Update (DFU) mode.
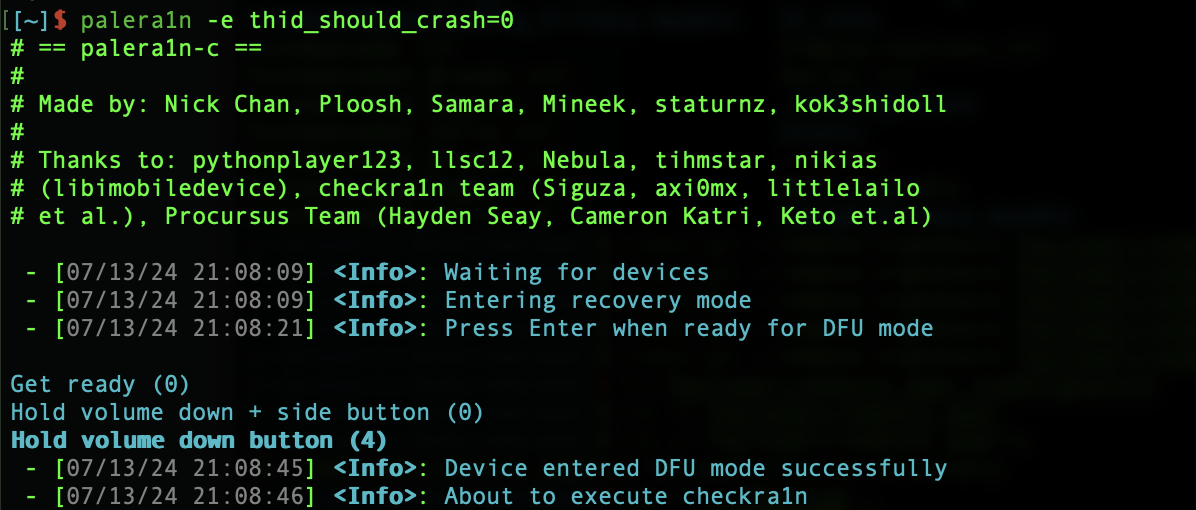
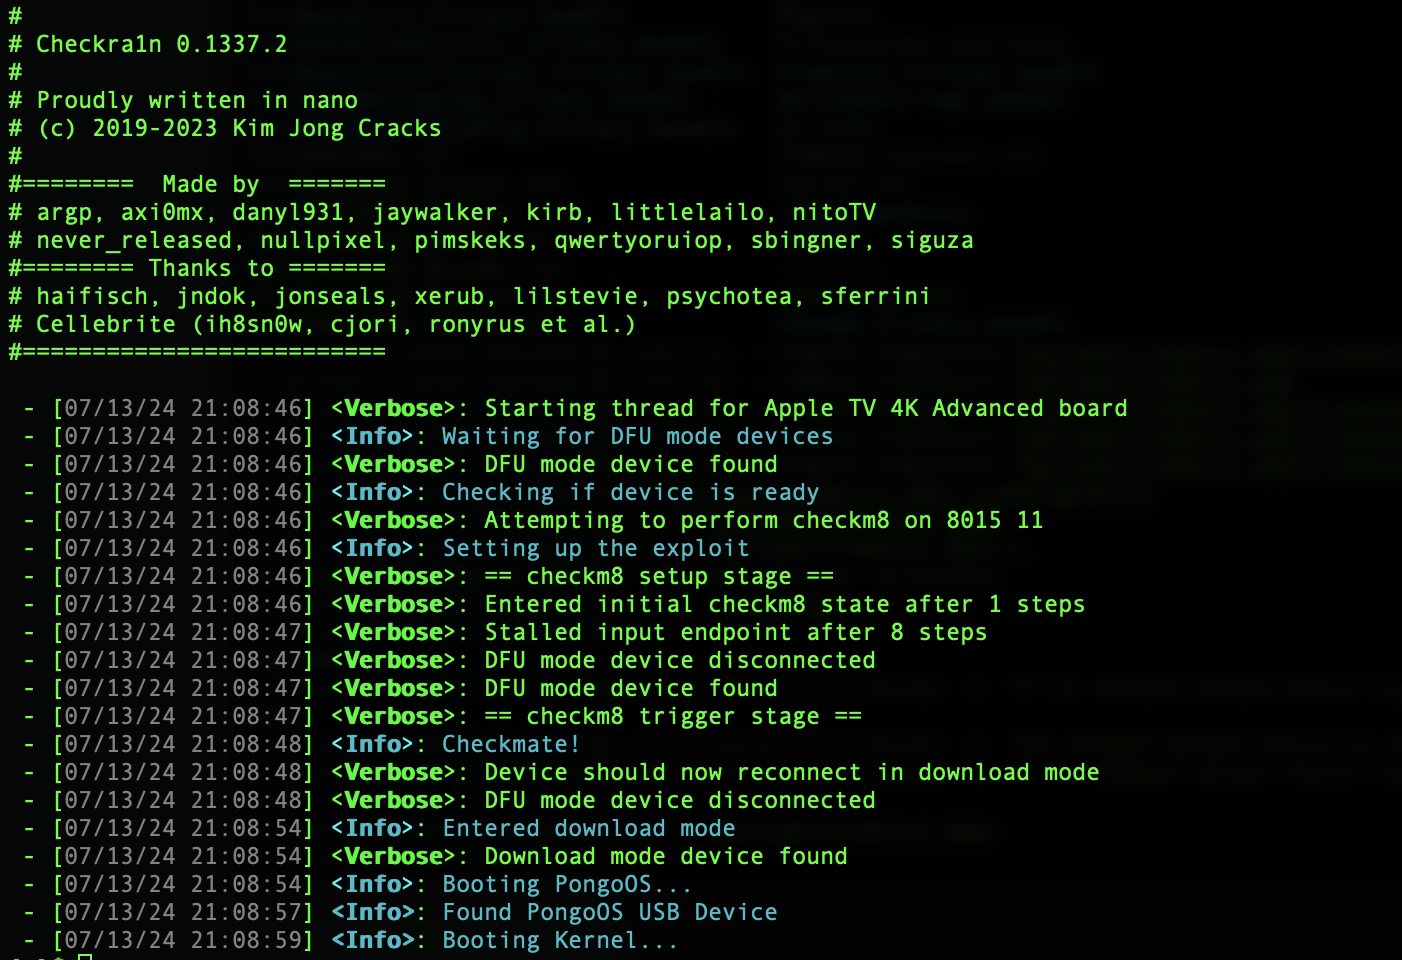
You should see the palera1n tool installing and triggering checkm8 on the device like below. If all goes correctly, on the device itself you should see some verbose boot information written over the Apple boot logo, while the device boots into pongoOS.
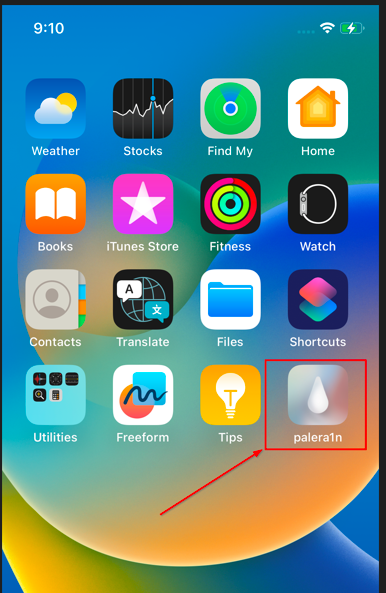
Then after the device boots up we should see the palera1n app installed on our home screen.
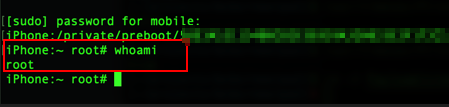
To confirm our root access via the jailbreak, we can connect to the device over SSH and try to sudo su. For my device, the SSH account used to connect was mobile with a password alpine, and use that same password for sudo escalation.
As seen below, our user is out of jail and busting loose!
Warning: As of this post, palera1n is still a semi-tethered jailbreak, meaning the jailbreak is not persistent. If the iPhone reboots then we need to follow the above steps to re-jailbreak it.
Final Touches
Now that we’ve jailbroken our device, we can begin installing our own packages and fully configure the device for appsec testing. To me, this means having jailbreak detection bypass tweaks as well as our trusty frida at our disposal.
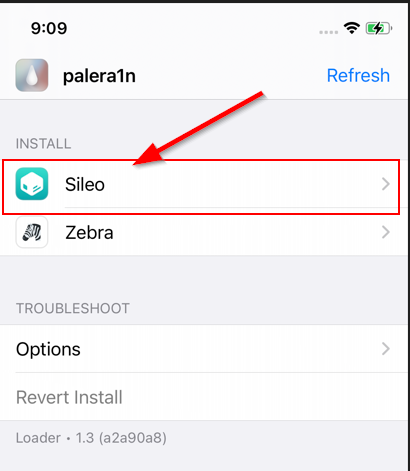
Within the palera1n app, you can chose an alternative package manager to install. I prefer using Sileo, but at this point you can use whatever you prefer.
3rd party package managers enable us to install apps directly on the device without needing the Apple App Store, but the catch is that these packages aren’t always vetted to confirm they aren’t doing anything malicious. If you’re technical enough to be jailbreaking your phone, then you’re likely capable of vetting them yourself… but always use at your own risk ;)
All that being said, the Frida project is very legit and worth having on our device - so lets set it up! First, we need to tell Sileo where to locate the published packages. Press the \(+\) button to add a package source repo, and type the following:
https://build.frida.re/
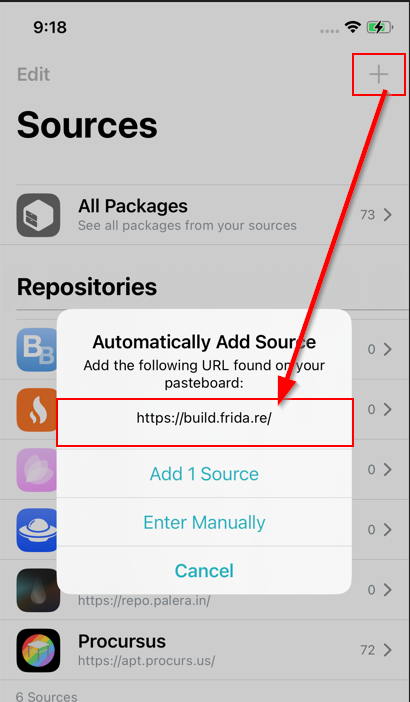
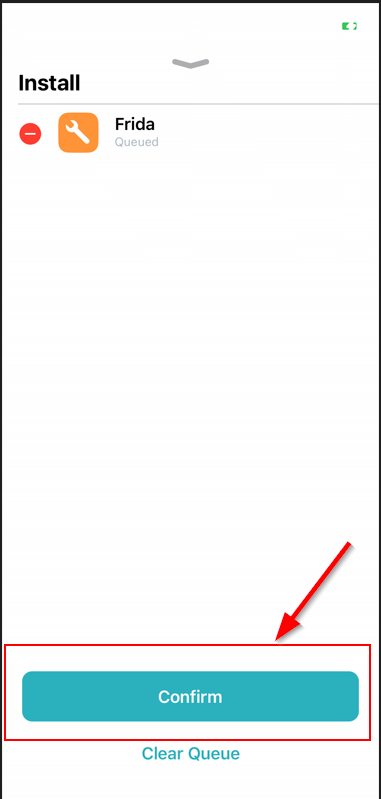
If added correctly, we should see Frida as a new package repository in Sileo. Select the Frida package and queue it and its dependencies up for installation.
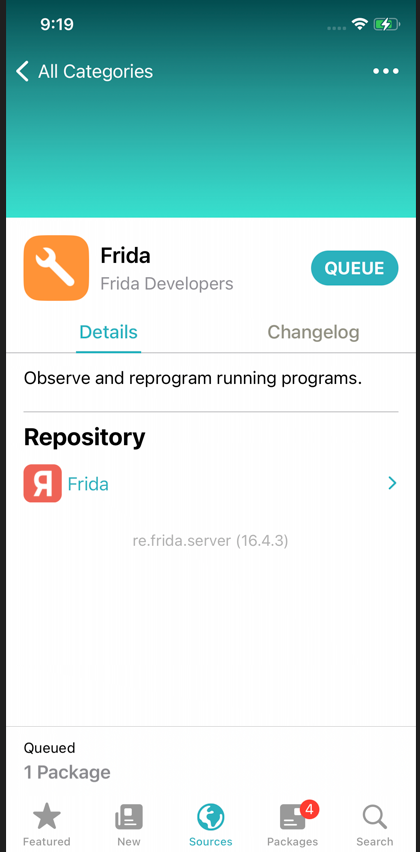
Hit confirm and your iPhone should immediately begin downloading and installing the necessary binaries and dependencies to run the frida server on the device.
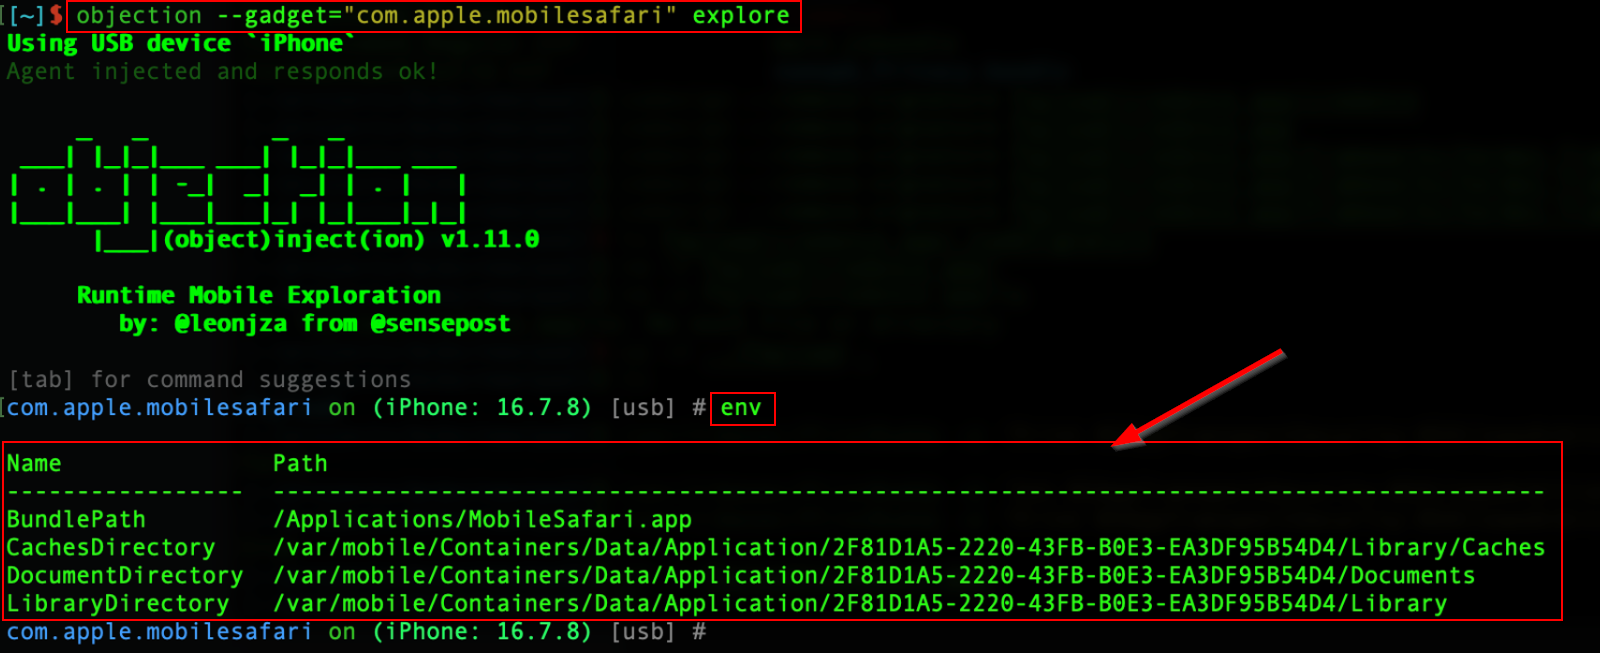
Once finished, we do a quick test to confirm we have frida ready to go. The Objection framework provides a fantastic set of dynamic analysis tools for mobile applications, and it’s functionality depends on a valid frida server to connect with on the device. In other words, if we can use objection to interact with apps on the device, that should prove frida installed without a hitch. First, we use the --explore gadget to interact with some app on the device, let’s say Safari, using:
objection --gadget com.apple.mobilesafari explore
Then we run a quick env command inside the objection context to list out library and data storage information about the Safari app. As revealed below, we’ve confirmed frida installed with no issues.
Perfect, we’re almost done! Last step is to configure some kind of jailbreak detection bypass. When looking at applications that routinely handle sensitive data, I’ve encountered various jailbreak detection mechanisms that required implementing a bypass to proceed with the analysis.
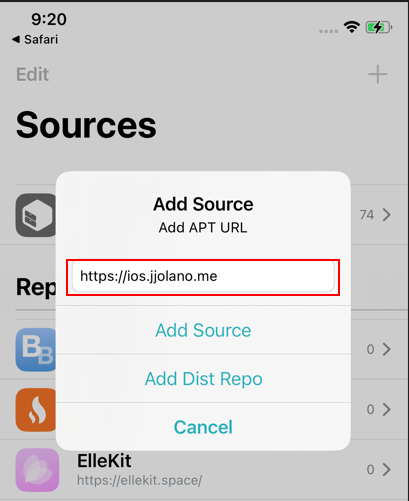
Fortunately, we control the underlying device, so we should always have a way around any pesky jailbreak checks. Personally, I use Shadow to hide my jailbroken status, so lets do a demo installation.
First, we add the repo for Shadow like we did with Frida.
Next, install Shadow and it’s dependencies.
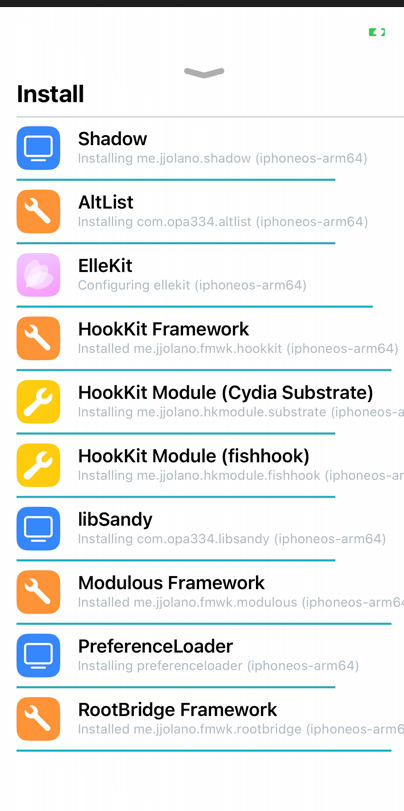
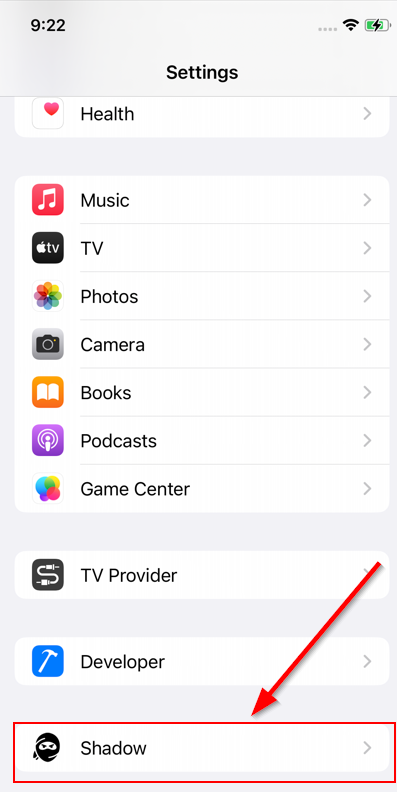
Once the installation completes, inspect the “Settings” menu and we should find “Shadow” has a tile to explore. Tap it to open up its options.
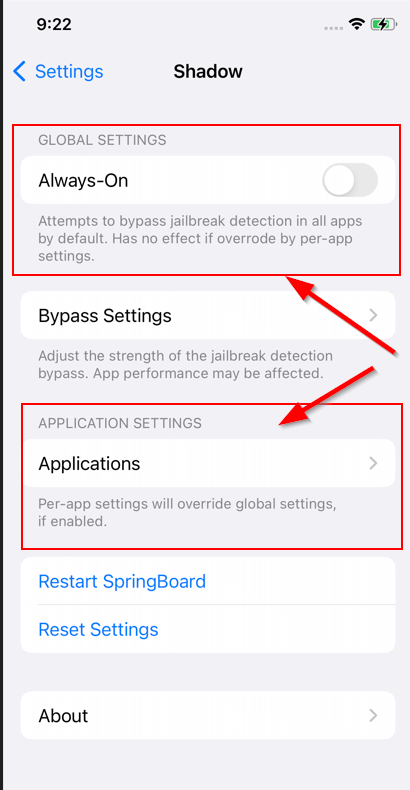
In this menu we can exert more granular control over Shadow’s functionality. Two key settings to note are the “Always-On” global setting, which will force into use at all times, and the “Applications” listing, where we can configure Shadow to hide the device’s jailbreak on a per-app basis.
Outro
There you have it! Two devices all squared away for mobile application security testing. Thanks for sticking with me to the bitter end. As a companion to this post, I’m planning to walkthough a full setup for testing mobile applications and conducting mobile appsec tests, so stay tuned for that future post.