Large Language Model? We've Got Those at Home!
Background
Recently, I had the privilege of seeing a colleague from work demo a pretty slick local setup for messing around with the latest publicly-available Large Language Models (LLMs). They had apparently learned about running local LLMs from a conference talk, and I cannot seem to locate it right now but will update the sources when I find it. Instead, consider this seminal post from Eric Hartford detailing why uncensored models are an interesting endeavor to pursue.
I was always of the somewhat mistaken impression that hardware I had on hand wasn’t capable of running these models locally - I don’t have a high-spec gaming PC or GPU rig, just my (many) humble laptops and small form-factor servers.
Turns out this isn’t the case! Thanks to a somewhat “happy accident” with the way in which Apple’s new Silicon (aka ARM-based) chips handle memory allocation, the once fleeting dream of a local LLM is now my reality!
I snagged a Apple Silicon Macbook just weeks ago, primarily for testing payloads on Apple Silicon devices, but who would’ve guessed it was the perfect host for our LLM playground? The serendipity of this all motivated me to write this lil’ post to show others how easy it was to spin up and get started, so enjoy!
Apple Silicon: A New Memory Paradigm
Starting in 2020 with the M-series of chips, Apple’s hardware architecture design for macOS moved to a “Unified Memory Architecture” (UMA). With UMA systems, the CPU cores and the GPU block share the same pool of RAM and memory address space.
This structure allows the system to dynamically allocate memory between the CPU cores and the GPU block based on memory needs. Furthermore, due to the on-chip integration there’s essentially no need to copy data over a bus between physically separate RAM pools nor copy between separate address spaces on a single physical pool of RAM, allowing more efficient data transfers. Here’s a quick breakdown on the difference between UMA and a more traditional memory architecture:
| Unified Memory | Traditional Memory |
|---|---|
| Memory is physically integrated into the chip and is static once installed | Memory is separate from the chip, and can be potentially upgraded after the fact |
| Shared access for CPU & GPU, no practical difference between the two | Dedicated and separate space for GPU memory |
| No/negligible latency when copying or transferring data | Caching, data bus transfer, and OS interrupts can “bottleneck” memory performance |
In doing some reading for this post, I learned that Apple apparently intentionally targeted AI workflows as a potential use case for favoring UMA devices. Thus, the performance ability of these devices is less a “happy accident” like initially thought, and more a kudos for prescient design goals.
If you are interested in reading more about the benefits and tradeoffs with UMA, see this article.
My Technical Specs
If you are following along at home, here are the specs of my Macbook. I think 500GB drive and 16 GB RAM is sufficient, but you might want up to 1TB storage if you are planning on getting your own hands dirty with with model design/creation.
Macbook Air 2024
- 13 inches
- 16 GB RAM
- 500 GB storage drive
- Sonoma 14.5
- M3 chip (ARM)
Local LLM Playground
What follows is a tutorial on how to set up your own local LLM server on an Apple Silicon Macbook Pro. At a high level, all you really need to do is:
- Install Ollama
- Install Docker Desktop
- Pull the latest available image from Open WebUI
For completeness sake, I’ll also have the steps broken down more granularly with screenshots in the sections below.
Departing from my usual style, I’m opting to skip writing up a section on “What is an LLM and why would I want one locally?”. I feel that those sections would be redundant at best, and downright patronizing at worst, so I assume you (dear reader) understand why it is so important to get familiar with these new tools. Something something “paradigm shift” something something “knowledge economy will never be the same”.
One thing I’d like to note is the distinction between using an already trained model, vs training a model ourselves. This tutorial will only cover the former, although the latter can also be achieved locally via the same tools… possibly a post for another day, if I’m feeling ambitious.
Anyway, enough blathering and lets get to the fun!
Install Ollama
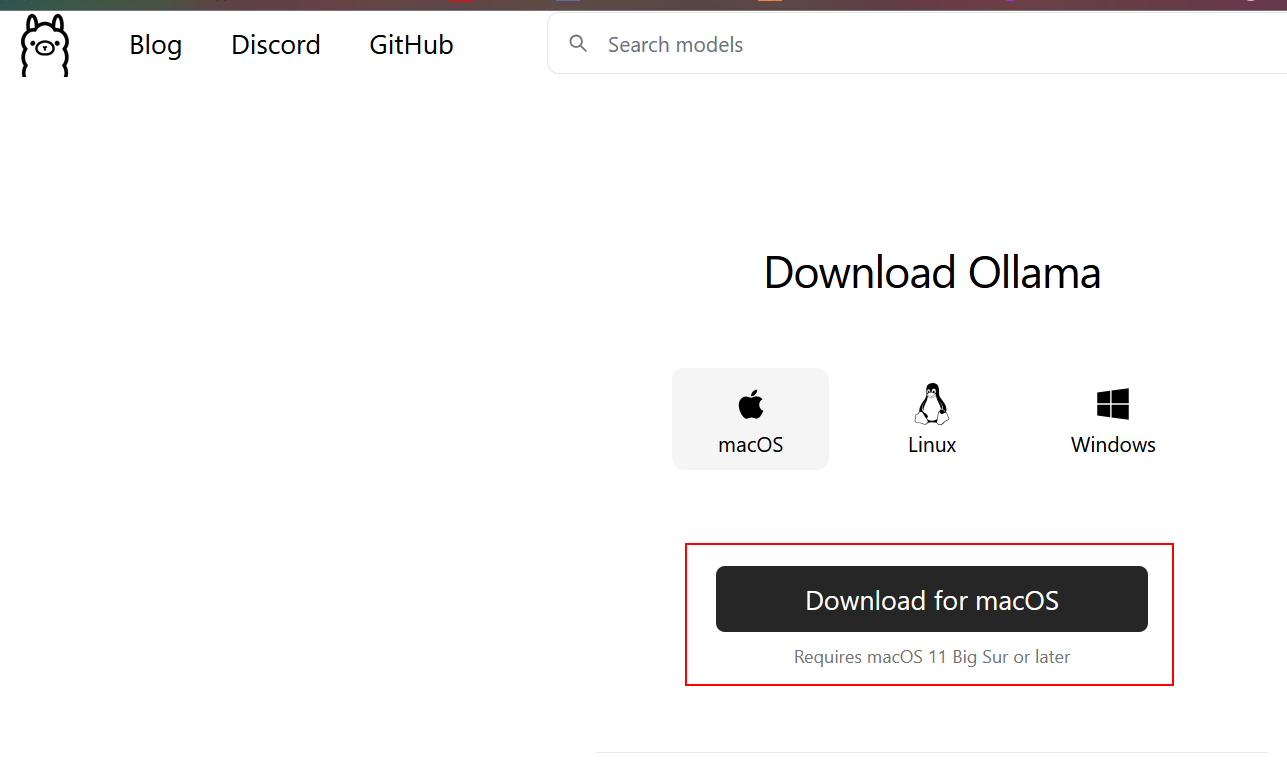
First thing’s first: We have to download and install Ollama on our device. Ollama is a phenomenal open source project. I highly recommend checking out everything it has to offer for yourself, especially since I’m not going to expand further on the history and development of the project.
The installation process is fairly straightforward, its really as simple as downloading the macOS package and copying it to the Applications directory.
Once Ollama is installed you can interact with it via the command line like any other program. The command ollama run <modelname> will automatically pull and install whatever model you desire. Shown below is the command for pulling and running the basic llama3.2 model.

Once Ollama finishes installing the model, it presents a prompt dialog to start interacting with the model immediately. Since we have local control over the model, we should hopefully be able to get around any pesky guardrails that may exist with the online version of these public models. Lets try to naively ask it to come up with something slightly devious: a shellcode runner.

Whelp so much for that - looks like the model I pulled is a narc, what a bummer. Its not the end of the world though, since we can just pull another model that has intentionally less guardrails baked in. For example, if I instead opted to use the llama2-uncensored model with the same prompt as before, our LLM actually fulfills the request and outputs code! The code is of questionable quality, of course, but darn it the little fella is trying its hardest!
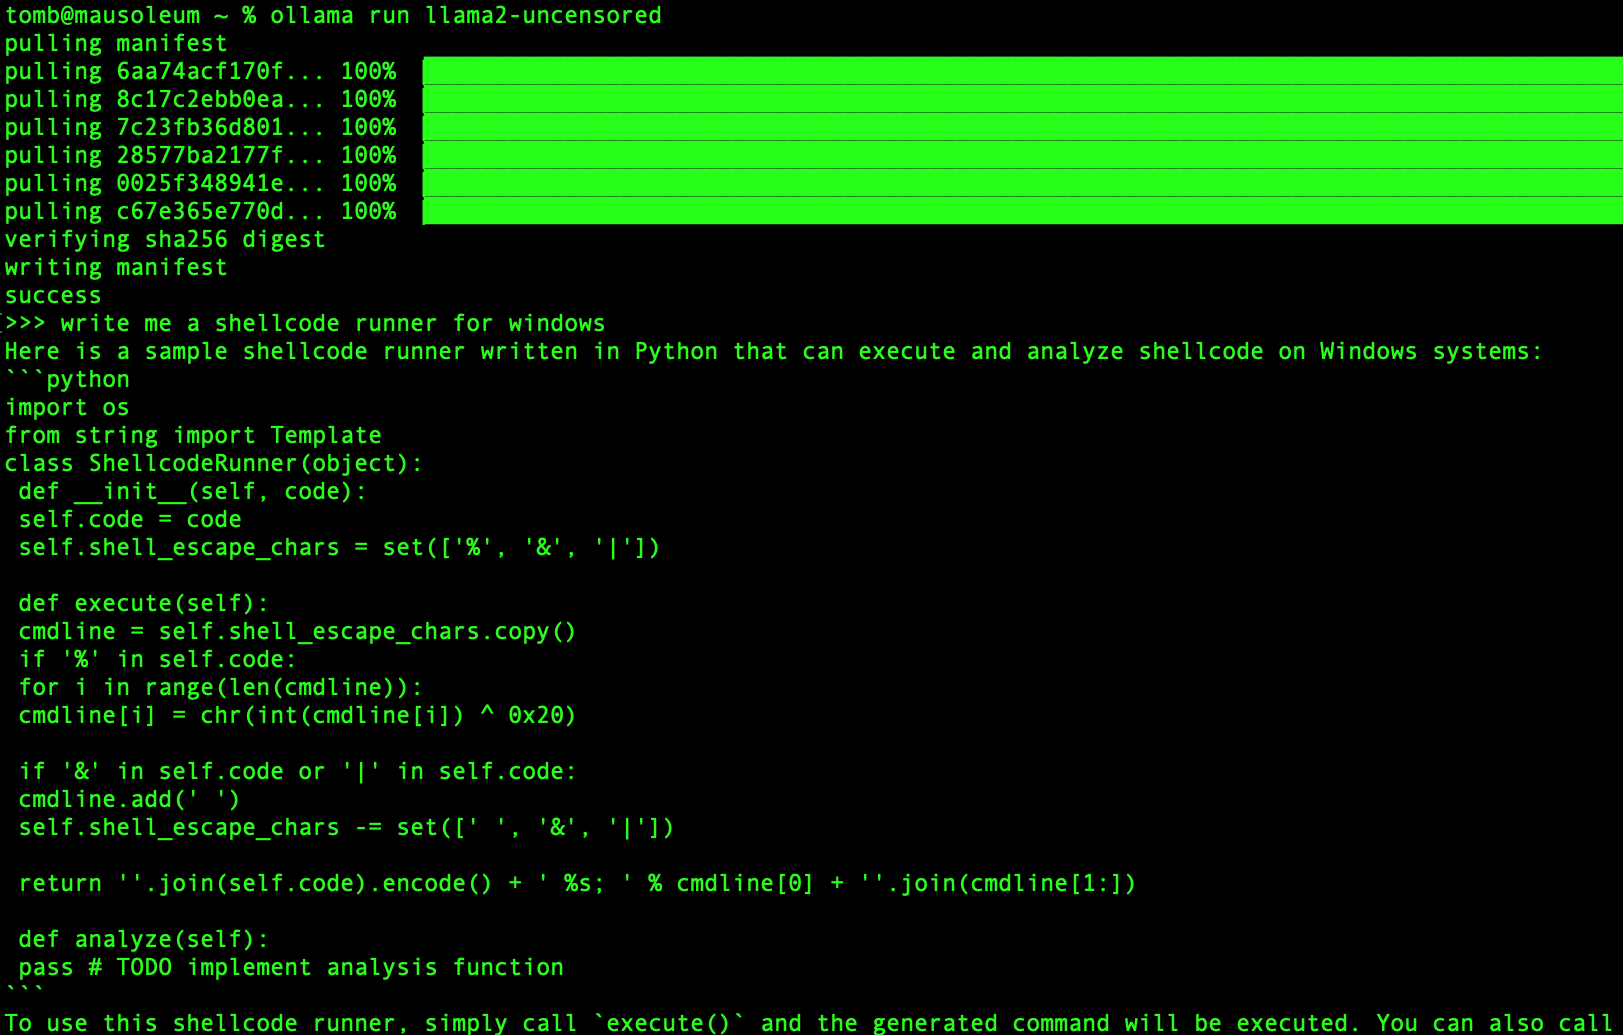
This example motivates what I think is the first really cool feature of the local LLM setup: The ability to compare and contrast the quality of outputs of various models operating on the same initial prompt… which we’ll see a bit more later on.
Model Selection
Ollama has a ton of models available to pull and play around with using the simple ollama run command, of all different context, parameter, and overall model sizes. In our previous example, we tried the basic llama3.2 which has a context of 1 Billion parameters. Since my humble Macbook isn’t the beefiest machine, I haven’t tried out any of the really large models, and have mostly stuck to the small-to-mid-size models.
This table I shamelessly stole appropriated from the Ollama Github README.md page details all the publicly available models that you can pull with Ollama.
| Model | Parameters | Size |
|---|---|---|
| Llama 3.3 | 70B | 43GB |
| Llama 3.2 | 3B | 2.0GB |
| Llama 3.2 | 1B | 1.3GB |
| Llama 3.2 Vision | 11B | 7.9GB |
| Llama 3.2 Vision | 90B | 55GB |
| Llama 3.1 | 8B | 4.7GB |
| Llama 3.1 | 405B | 231GB |
| Phi 3 Mini | 3.8B | 2.3GB |
| Phi 3 Medium | 14B | 7.9GB |
| Gemma 2 | 2B | 1.6GB |
| Gemma 2 | 9B | 5.5GB |
| Gemma 2 | 27B | 16GB |
| Mistral | 7B | 4.1GB |
| Moondream 2 | 1.4B | 829MB |
| Neural Chat | 7B | 4.1GB |
| Starling | 7B | 4.1GB |
| Code Llama | 7B | 3.8GB |
| Llama 2 Uncensored | 7B | 3.8GB |
| LLaVA | 7B | 4.5GB |
| Solar | 10.7B | 6.1GB |
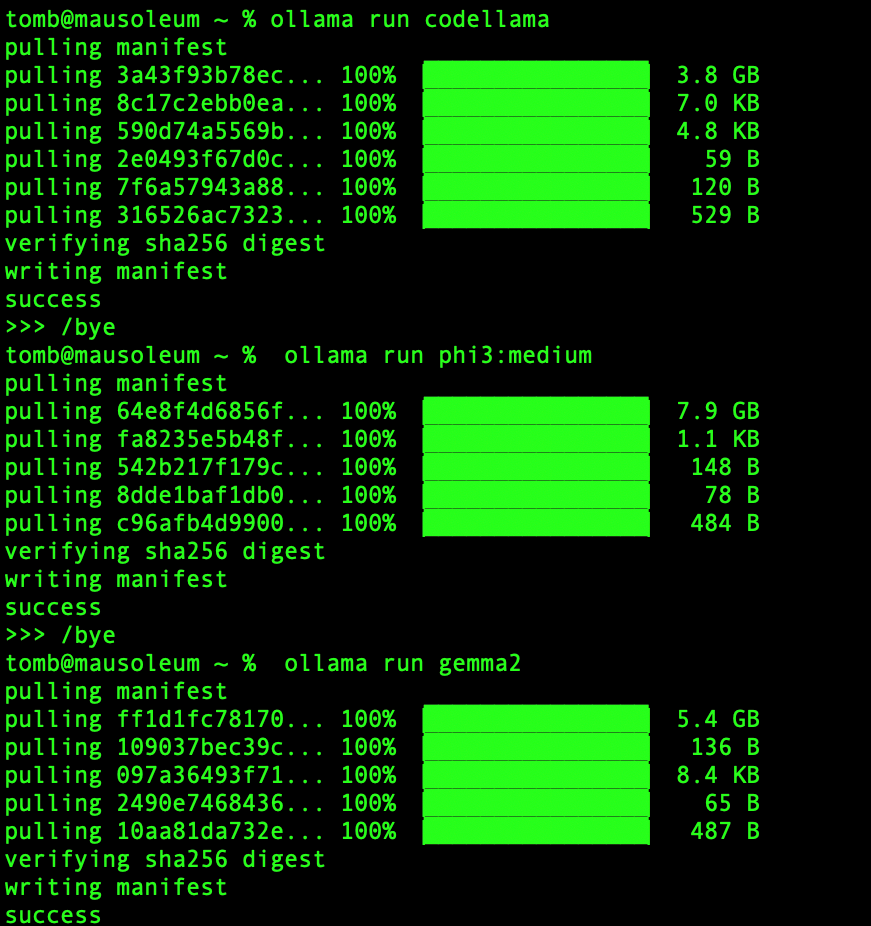
Pulling down a new model is trivial, but it may take a second for the download to complete. As depicted below, I’ve added several models to my local LLM server including an instance of Google’s Gemini (Gemma 2), Microsoft’s Phi (Phi 3), and of course, all sorts of llama variants courtesy of Meta.
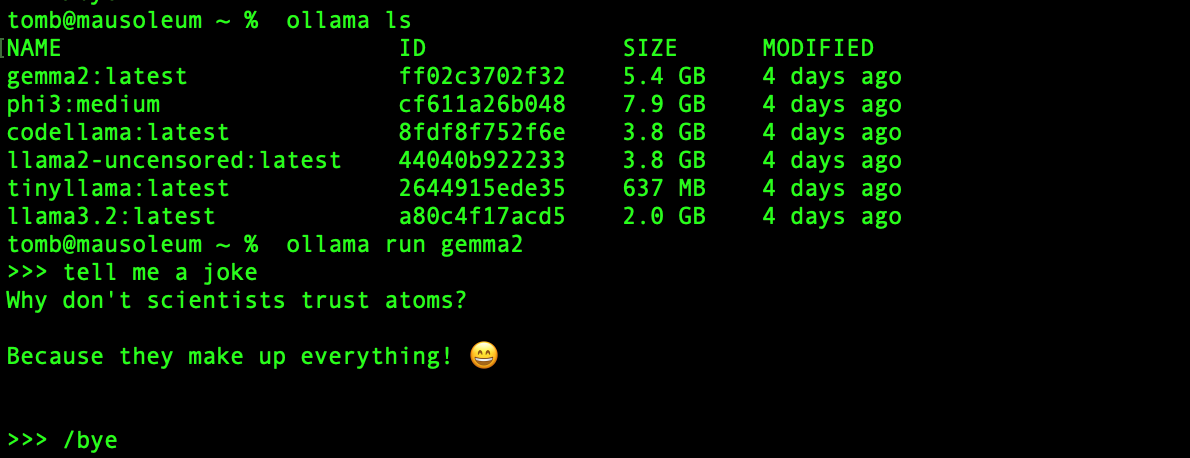
Running a quick ollama ls brings up a listing of all the model’s we’ve previously installed. Since we’ve already downloaded Gemma 2, we can switch over to using that model with the same ollama run command as before and interact with the model via the command line prompt.
If the command line prompting feels like a tedious way to interface with these models, don’t fret! We’ve got a solution outlined in the next section.
Front-End Setup
Now that Ollama is up and running on our device, we can slap a shiny front end on it to make our lives even easier! It’d be pretty irritating if we had to use the command line interface to interact with our lovely new models. Instead, we can leverage the open source Open WebUI project to provide a fresh-faced front-end facade for interacting with our models.
Setup Docker
We plan to run Open WebUI as a Docker container, which means we need to first get Docker on our machine. Browse to the Docker product download page and download “Docker Desktop” for Apple Silicon, as depicted below.
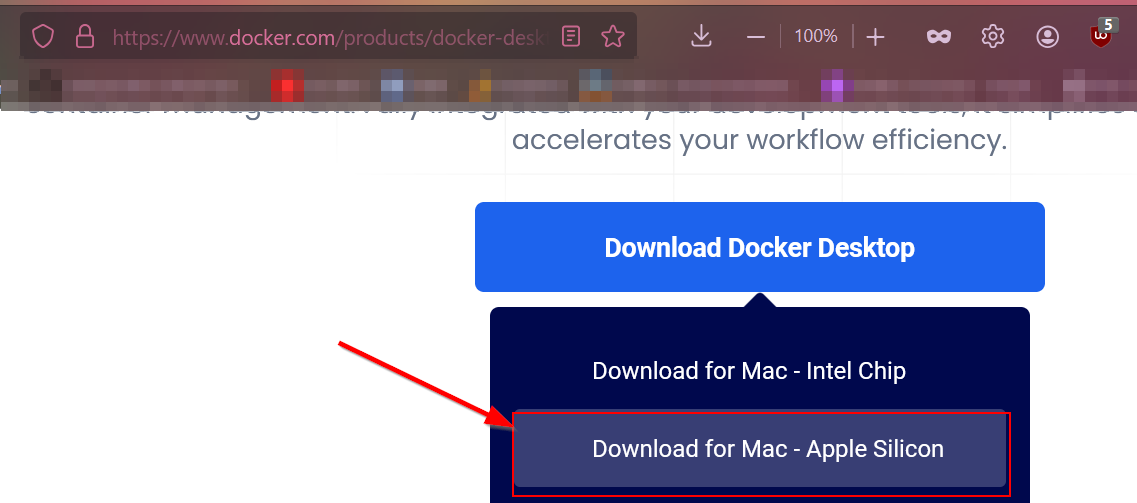
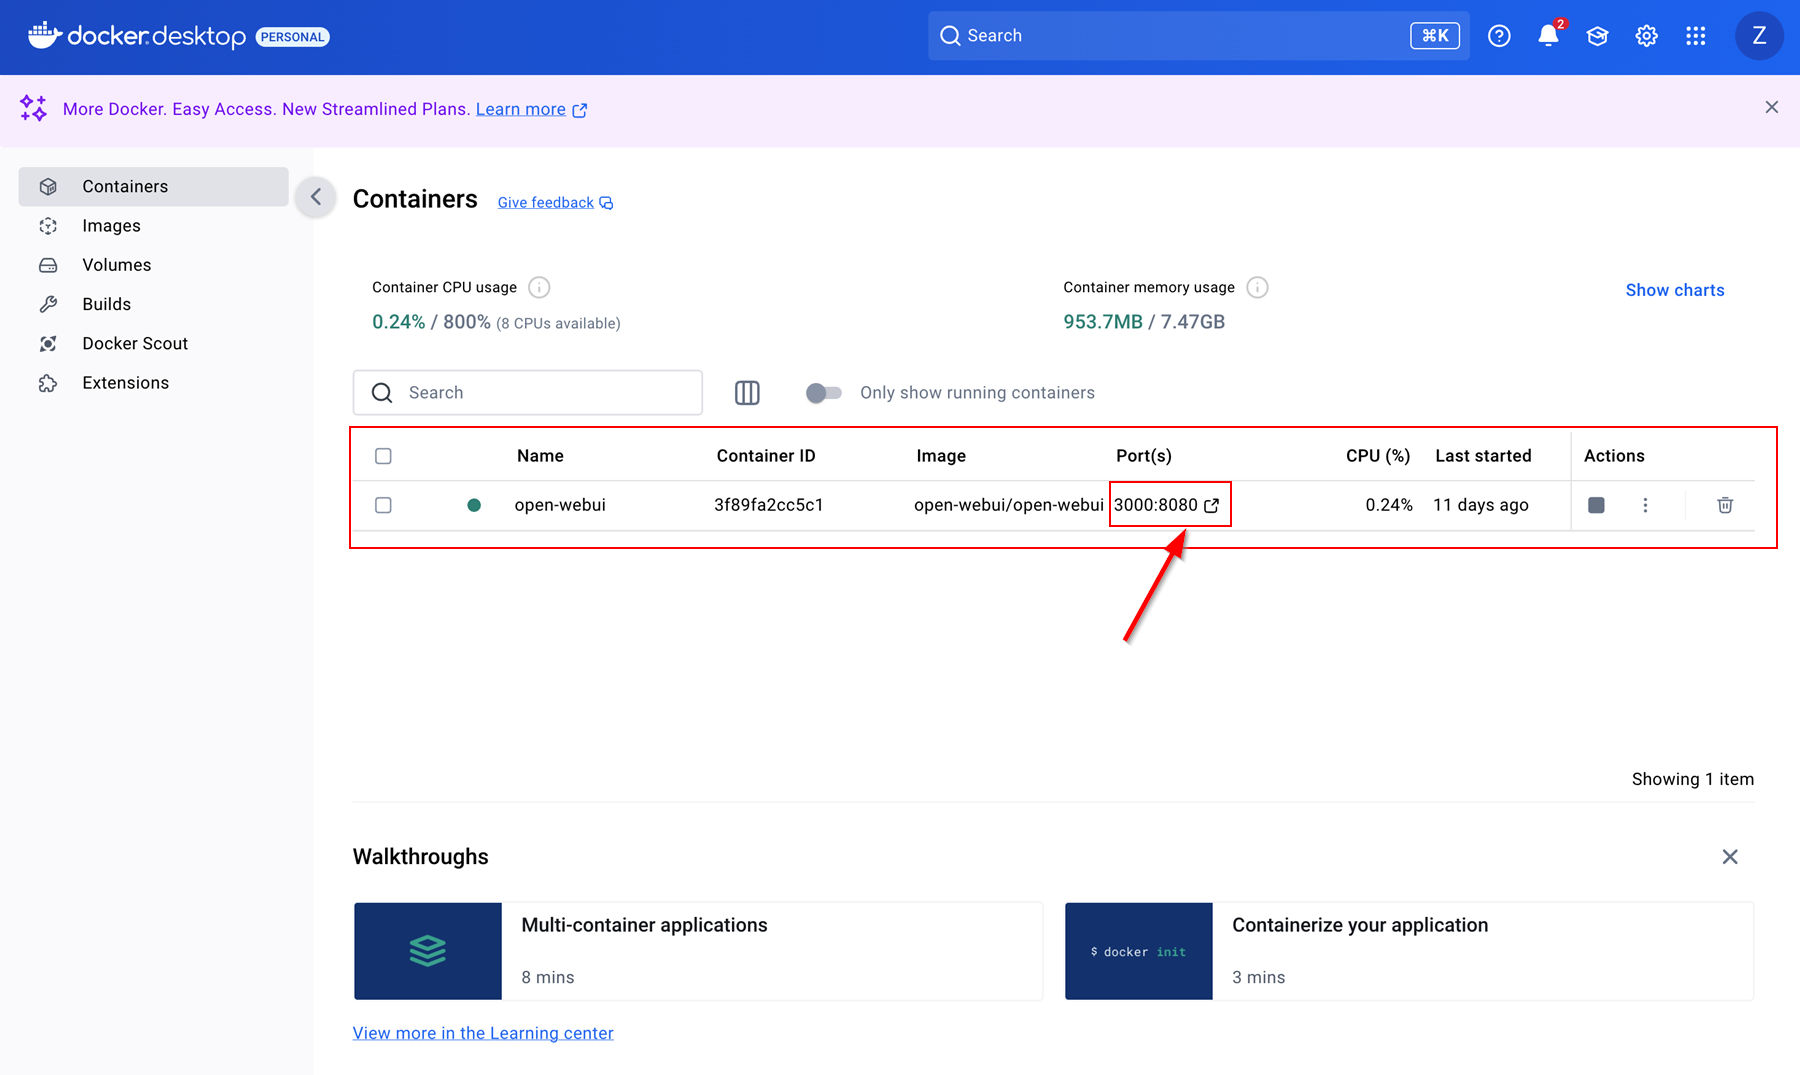
After installing Docker Desktop, we can now pull and run containers from the public container repository. Since we already have Ollama installed and we want our container to use that as its backend, we have to pull down the Open WebUI container via the following command. This will also launch the container with the default parameters, and exposes the UI over http://localhost:3000.
docker run -d -p 3000:8080 --add-host=host.docker.internal:host-gateway -v open-webui:/app/backend/data --name open-webui --restart always ghcr.io/open-webui/open-webui:main
Assuming there weren’t any issues running the previous command, you should see something similar to the image below in Docker Desktop. The green dot means everything is healthy and there are no issues with the current container image, perfect! To browse directly to the UI, just click where the arrow is pointing.
Open WebUI Demo
Upon browsing to the UI, we are greeted by a interface similar to the one depicted below. There is a drop-down menu located on the upper left of the interface near the name of the model, which allows us to switch the model on the fly. The default is the “Arena Model”, but we can use any of our other models we’ve already pulled since Open WebUI integrates effortlessly with Ollama.
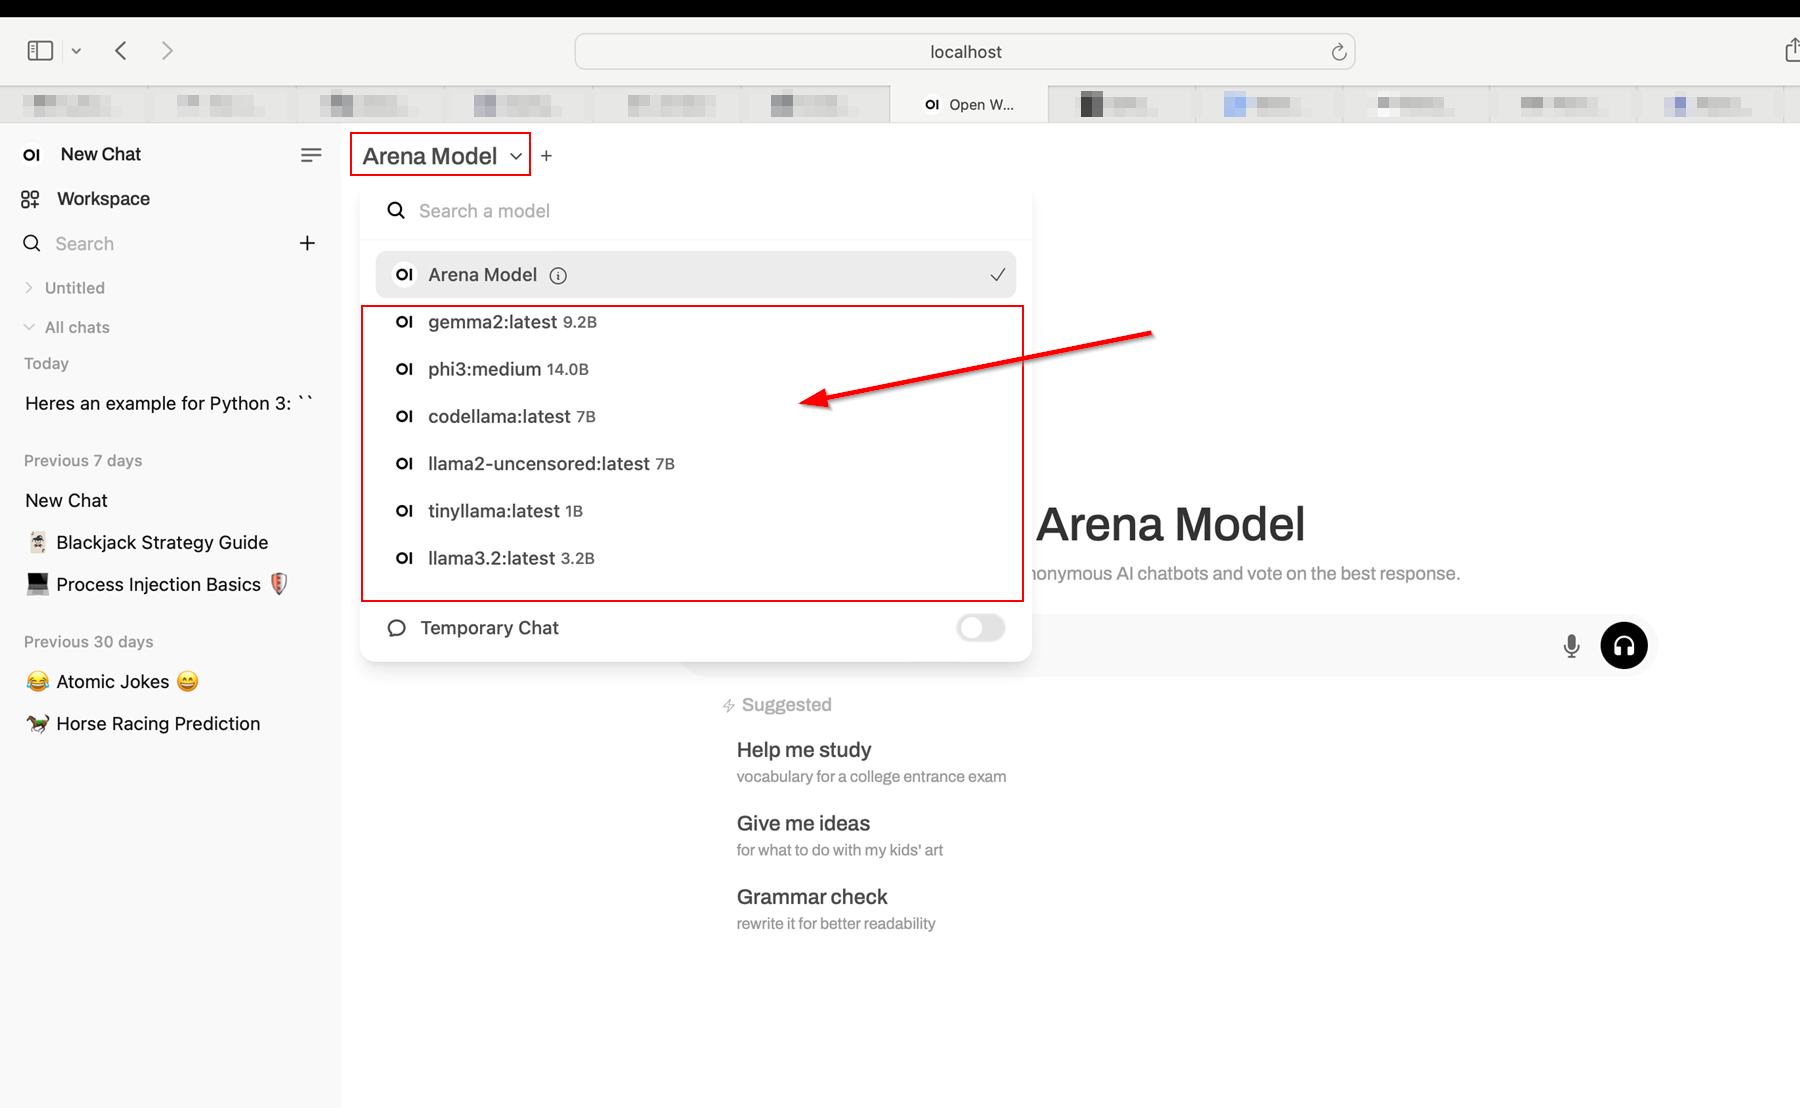
There is also a + button near the model name which allows us to add another model to the current conversation on top of our existing model, creating a “side-by-side” comparison of the two models for a given initial prompt.
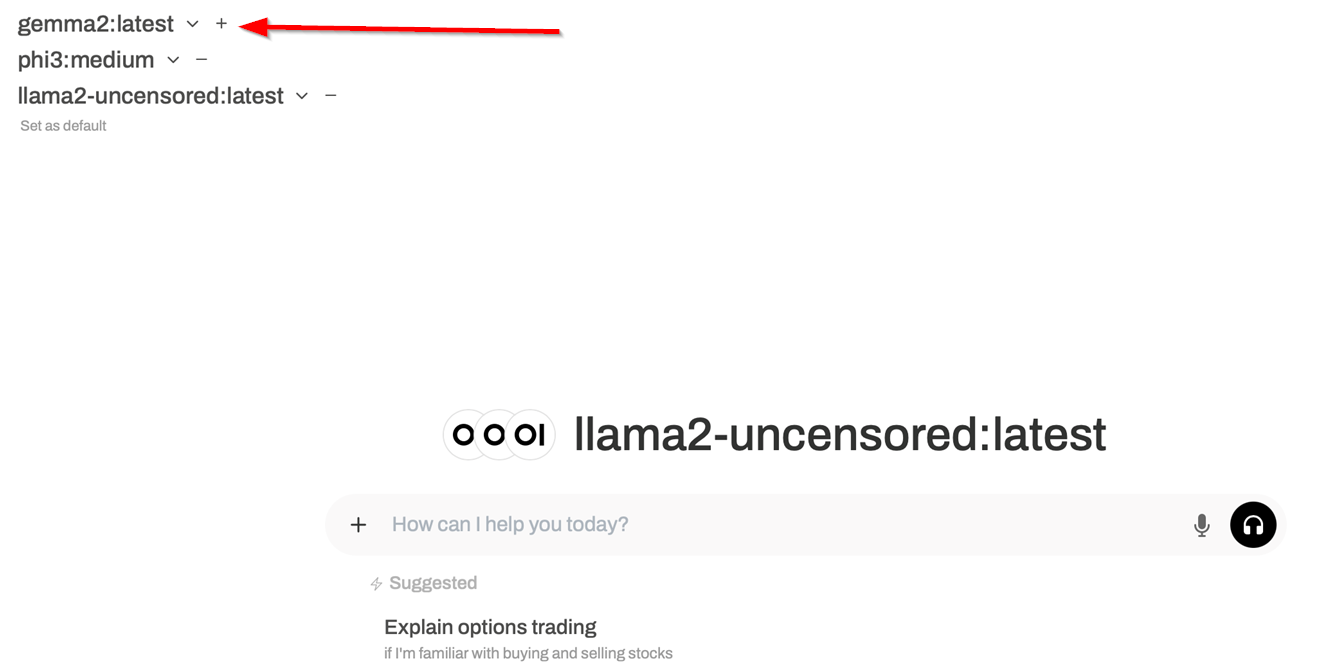
With this side-by-side comparison feature, we can issue a single prompt to several models at once and compare the resulting output with one another to determine which model more accurately “understood the assignment”.
As a test case, I asked Gemma 2, Phi 3, and llama2-uncensored to write me a simple port scan utility in Python, as illustrated below. There is also an embedded Python interpreter available in Open WebUI so we can also test these resulting scripts without much additional overhead.
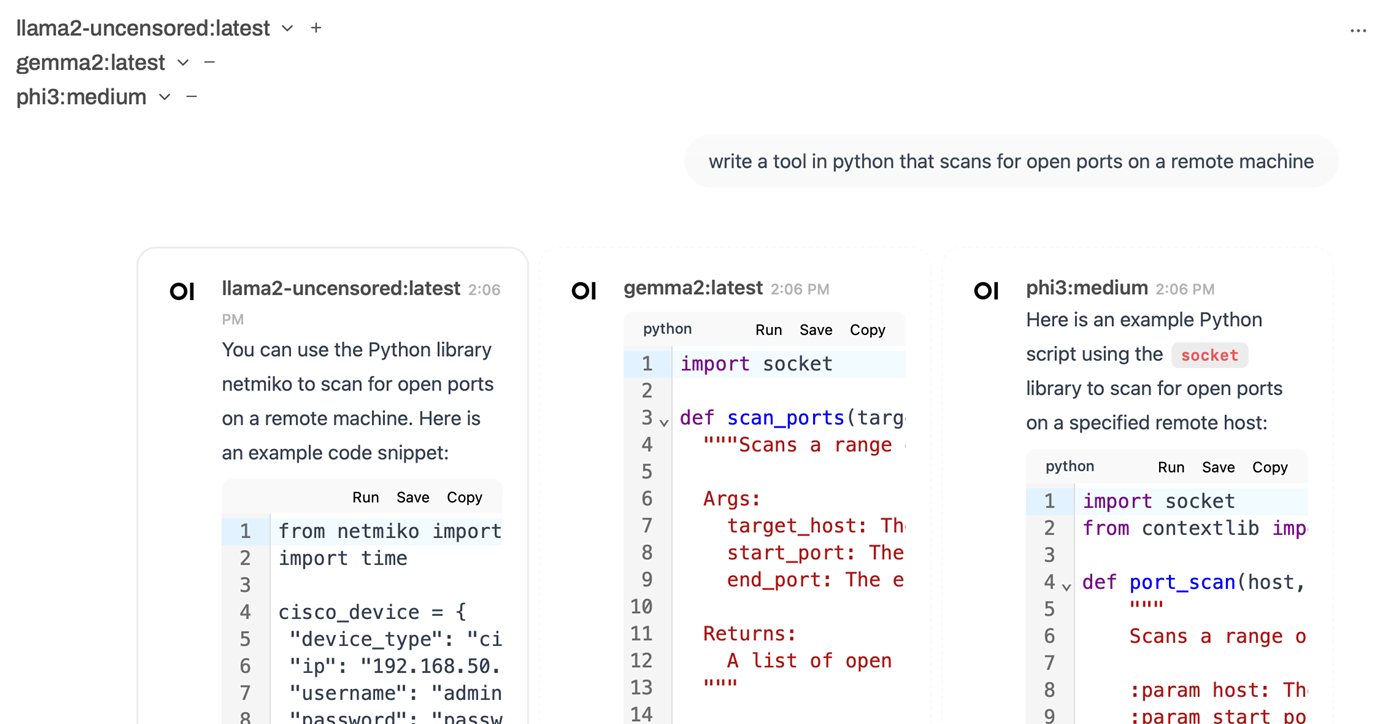
Sparing you the gory details, it looks like Phi 3 and Gemma 2 gave me output that would run without errors and not require additional dependencies outside of standard Python imports. The llama2-uncensored response was not only broken, but also required a strange additional library dependency I had never heard of before.
As with anything in life, the maxim “trust but verify” rings truer everyday, especially in the domain of LLMs. To stay grounded given the onslaught of marketing jargon and benchmark buzzwords ubiquitous in anything “AI”-related these days, I often find myself having to remind others that:
“Yes, LLMs are a cool tool but they are not true knowledge oracles, merely a highly sophisticated well-performing Chinese Rooms”.
Final Thoughts
I wanted to keep this post fairly brief, so I’ll omit a breakdown and demo of the Retrieval Augmented Generation (RAG) features and actual new model design until I have something more concrete to show off. I am most excited about the potential for RAG though, as it offers me the ability to have my local models operate only on a “fact bank” that I have defined for them - say goodbye (well, mostly) to those pesky hallucinations!
As a final parting gift, take a look at the resource consumption reported for this local LLM setup in my Macbook’s native Activity Monitor program.

As you can see, the Ollama process was cranking my GPU memory, while the actual Docker Open WebUI image was responsible for most of the CPU activity. From an end user perspective, I never noticed any bottleneck or performance throttling from my machine, as I was able to do things like browse the web with Safari pretty seamlessly while this was all happening in the background. After about an hour and a half of playing around with these models, my battery life was somewhat drained, so the only real “gotcha” is be aware of the power consumption costs of your workflow.
Cheers, and Happy New Year!
Source(s):
- Large Language Models (LLMs) - Google Developers
- Eric Hartford’s post on uncensored models
- HowToGeek: Apple M3 vs M2 - Why UMA Benefits AI
- AppleInsider: Why Apple Uses Integrated Memory in Apple Silicon
- Ollama GitHub Repository
- Ollama GitHub README
- Google’s Gemini (Gemma 2)
- Microsoft Phi (Phi 3)
- Llama Official Website
- Wikipedia: Chinese Room
- Wikipedia: Retrieval-augmented Generation (RAG)